Import Export extensions for Magento 2 streamline bulk data management for categories, URL rewrites, CMS pages, product reviews, newsletter subscribers, catalog price rules, cart price rules, CMS blocks, customers, products, and orders via CSV files. Administrators can efficiently import categories with details like IDs, names, descriptions, and products, or export them by store or ID. Similarly, they can import/export catalog and cart price rules, CMS pages (titles, layouts, content), product reviews (customer info, SKUs, ratings), customers, products, orders, and more. These tools simplify management, saving time and effort by automating tasks that would otherwise be done manually, significantly improving store operations.
Table of Content
Features
- Bulk Import/Export: Easily import/export large volumes of data via CSV files for various entities.
- CSV Validation: Validate CSV files before importing to ensure accurate data.
- Customizable Export: Select specific data fields for export, excluding unnecessary information.
- Automation: Saves time and effort by automating tasks like category creation, URL rewrites, and more.
- Improved Management: Streamlines the management of store data across multiple entities.
- Multi-Store Support: Import/export data across different stores and websites within Magento 2.
List of Import/Export Entities in this Extension:
- Newsletter Subscribers
- Catalog Price Rules
- Cart Price Rules
- URL Rewrites
- CMS Blocks
- CMS Pages
- Customers
- Categories
- Products
- Reviews
- Orders
Steps:
- Extension Installation Guide
- Configuration
- Extension Installation
- Download the zip file
- Extract and put it into /app/code/
- Open CLI in the Magento directory and follow the below commands.
- php bin/magento setup:upgrade
- php bin/magento setup:di:compile
- php bin/magento setup:static-content:deploy
- php bin/magento cache:clean
- php bin/magento cache:flush
- php bin/magento cron:install
- php bin/magento cron:run
- Configuration:
STEP 1
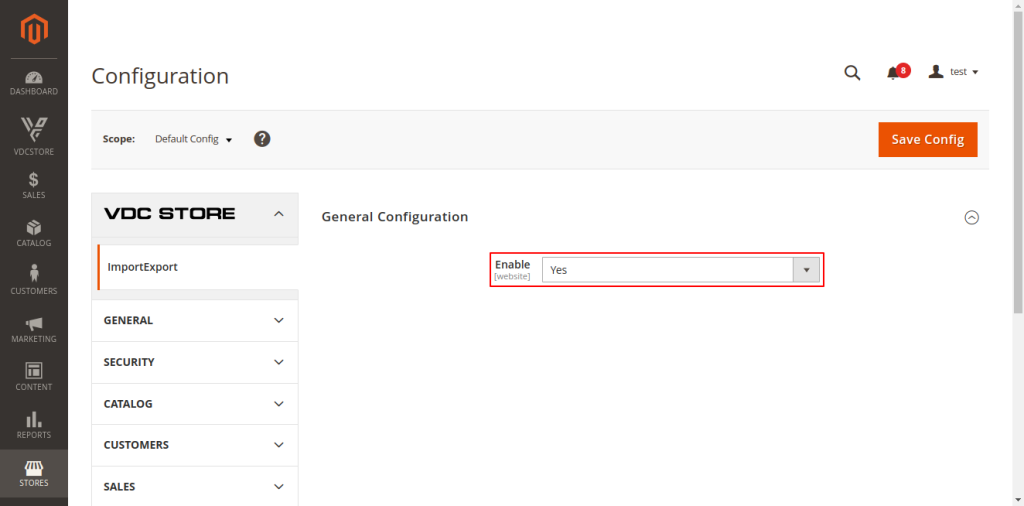
Go to Admin => Stores > Configuration > Vdcstore > Import Export
General Configuration
Enable: Select ‘Yes’ to enable this extension.
STEP 2
Export
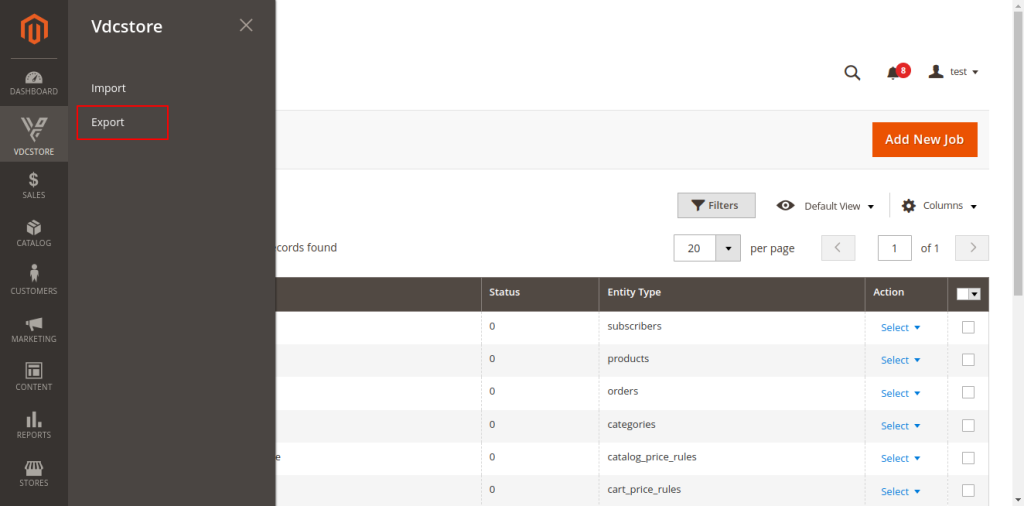
Go to VDC Store => Export – Users will be able to export the data.
STEP 3
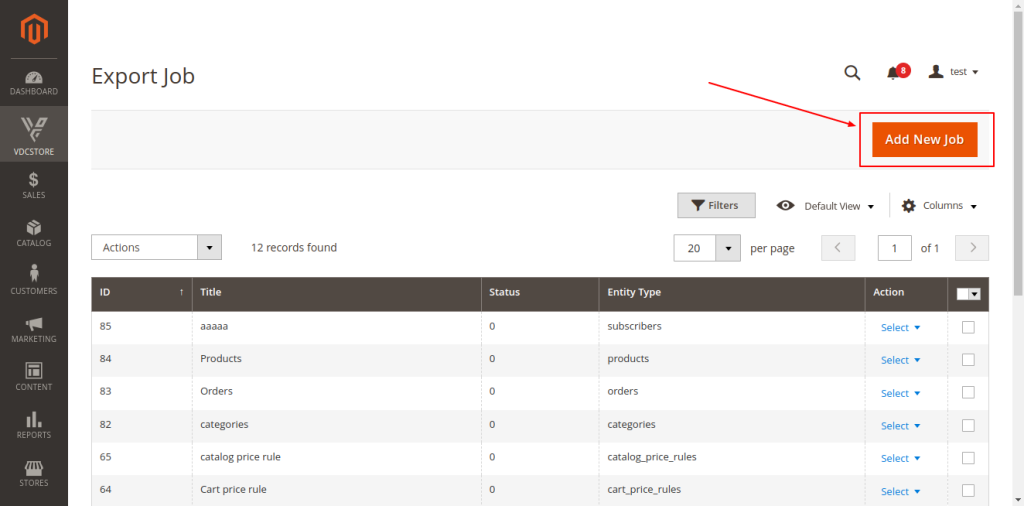
View all export jobs here – This section displays all created export jobs, allowing administrators to manage existing jobs easily. To create a new export job, simply click on the “Add New Job” button.
STEP 4
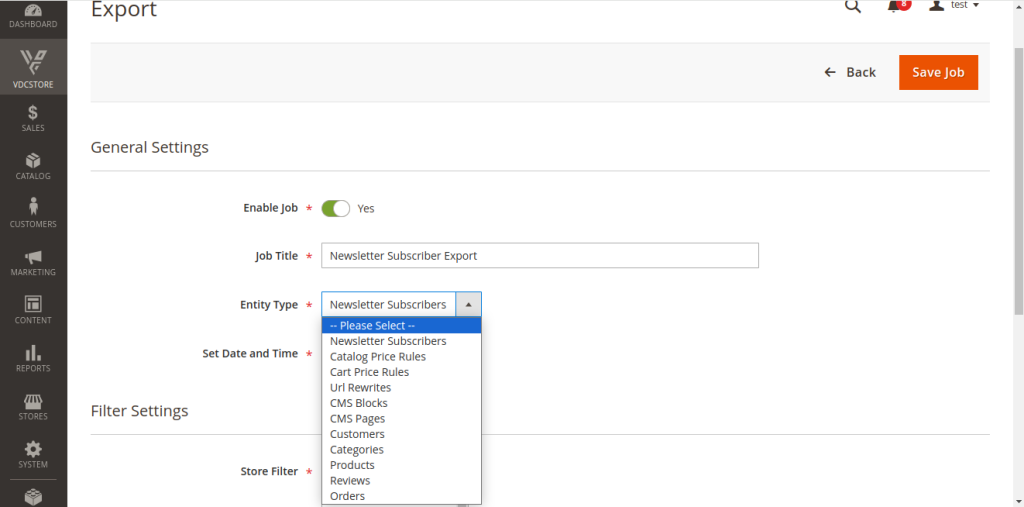
General Settings
Using this form, you can create a new export job for any entity, allowing you to select and configure the data you want to export efficiently.
Enable Job: You can set the job to “Enable” or “Disable” to control its activity.
Job Title: Enter the job title.
Entity Type: Select any entity you wish to export from the following options:
- Newsletter Subscribers
- Catalog Price Rules
- Cart Price Rules
- URL Rewrites
- CMS Blocks
- CMS Pages
- Customers
- Categories
- Products
- Reviews
- Orders
Set Date and Time: Set the date and time for the export job to specify when it should run.
STEP 5
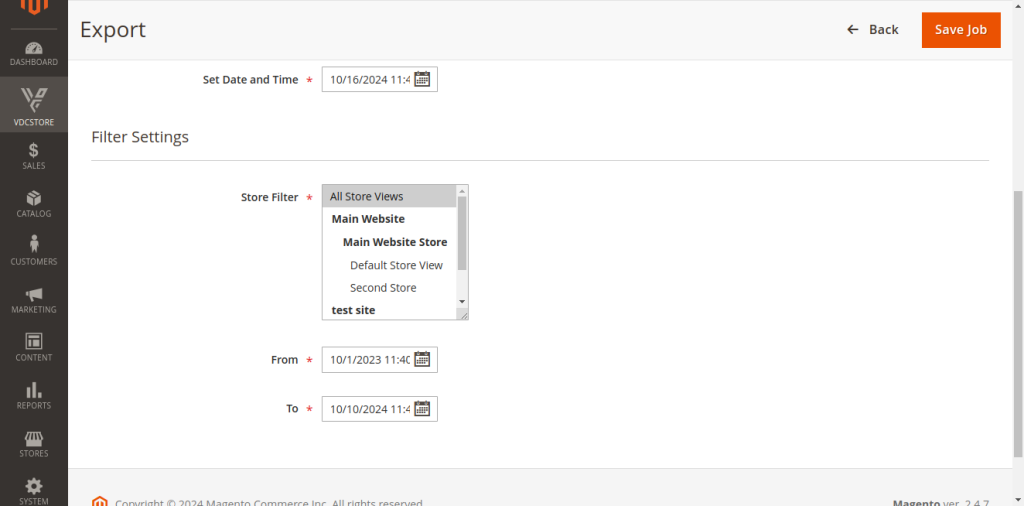
Filter Settings:
Store Filter: Select the store from which you want to export data.
From: Export data created after the specified date.
To: Import data created after the specified date.
STEP 6
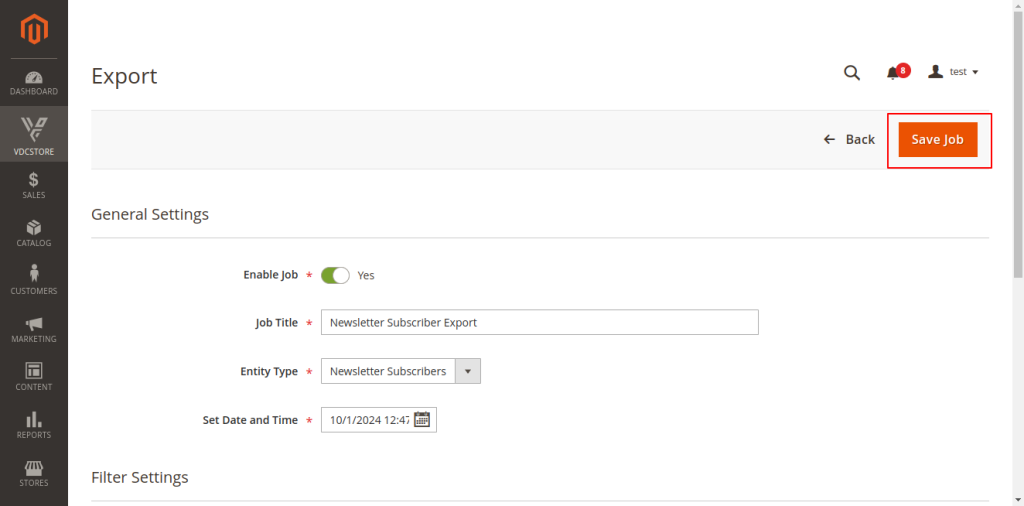
Fill in all the required fields and click on ‘Save Job’ in the top right corner to save the export job after entering all necessary details.
STEP 7
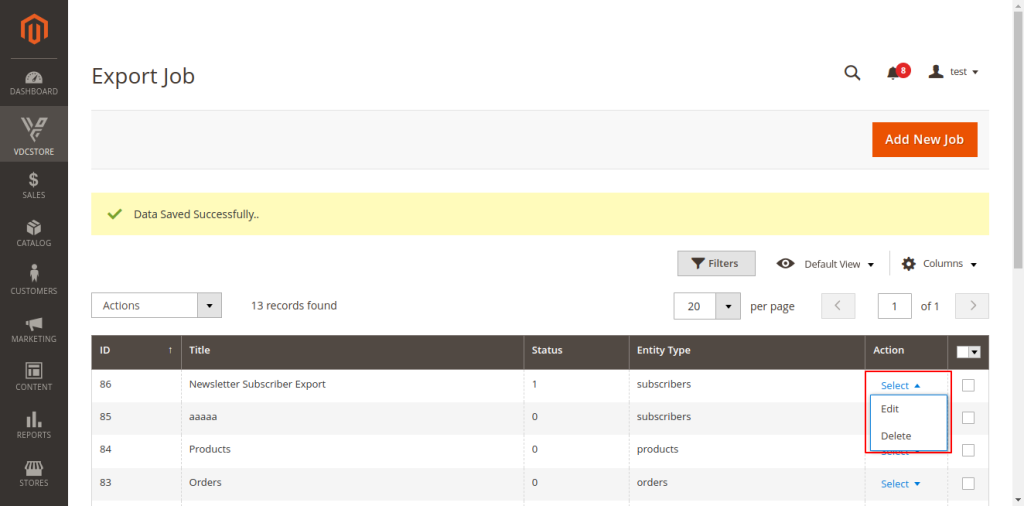
Here, the admin can view the list of jobs and select actions by clicking on ‘Select,’ where they can choose to ‘Edit’ or ‘Delete’ any job from the list
STEP 8
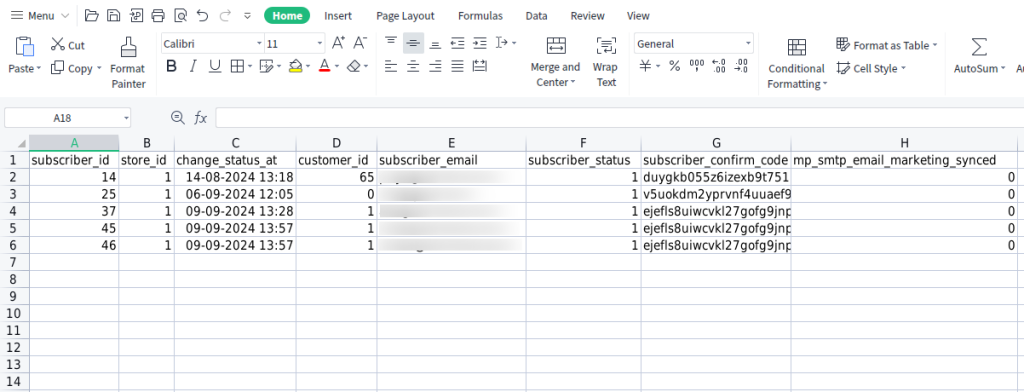
All exported files are stored in the following directory:
`magento/directory/pub/media/vdc_import/`.
STEP 9
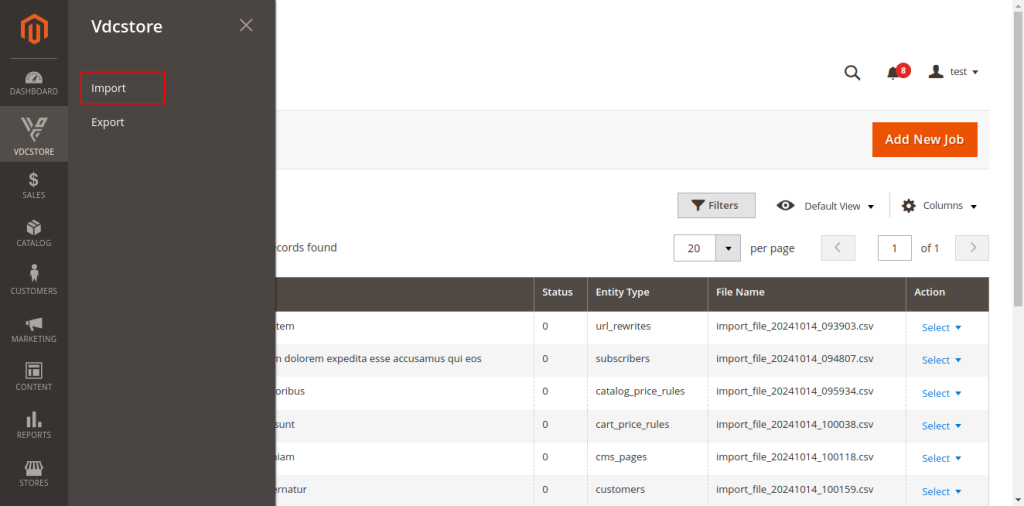
Go to VDC Store => Import
STEP 10
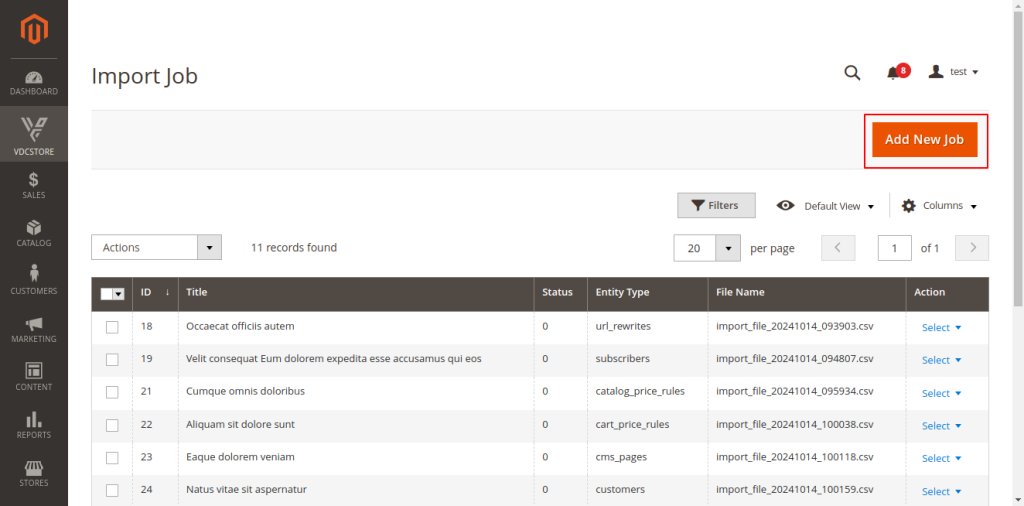
This section displays all created jobs, and you can create a new job by clicking on the ‘Add New Job’ button.
STEP 11
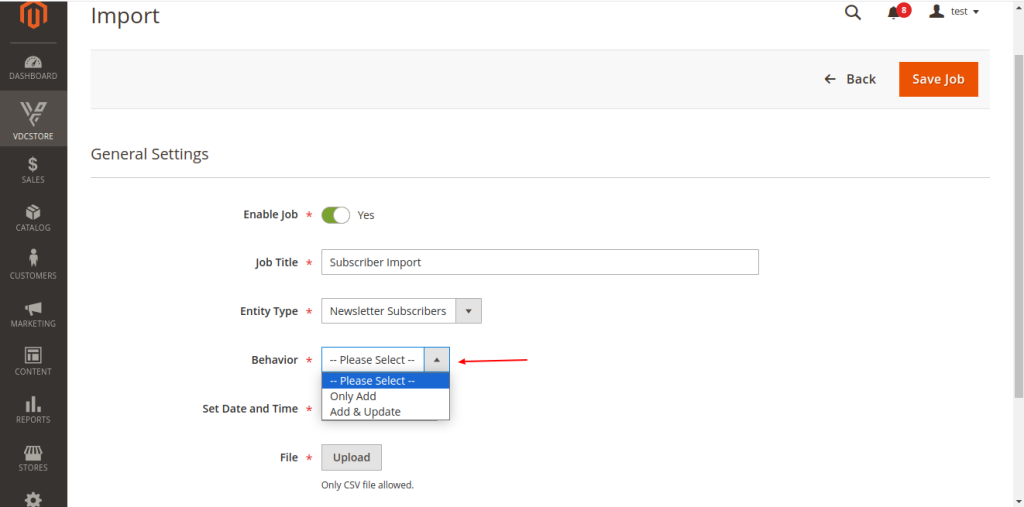
General Settings
Using this form, you can create a new job to export any entity efficiently.
Enable Job: You can set the job to “Enable” or “Disable” to control its activity.
Job Title: Enter the job title.
Entity Type: Select any entity you wish to import.
- Newsletter Subscribers
- Catalog Price Rules
- Cart Price Rules
- URL Rewrites
- CMS Blocks
- CMS Pages
- Customers
- Categories
- Products
- Reviews
- Orders
Behavior: Select type of behavior such as; ‘Only Add’ or ‘Add & Update’
Set Date and Time: Set the date and time for the export job to specify when it should run.
File: Upload the file here for import; only CSV files are allowed.
STEP 12
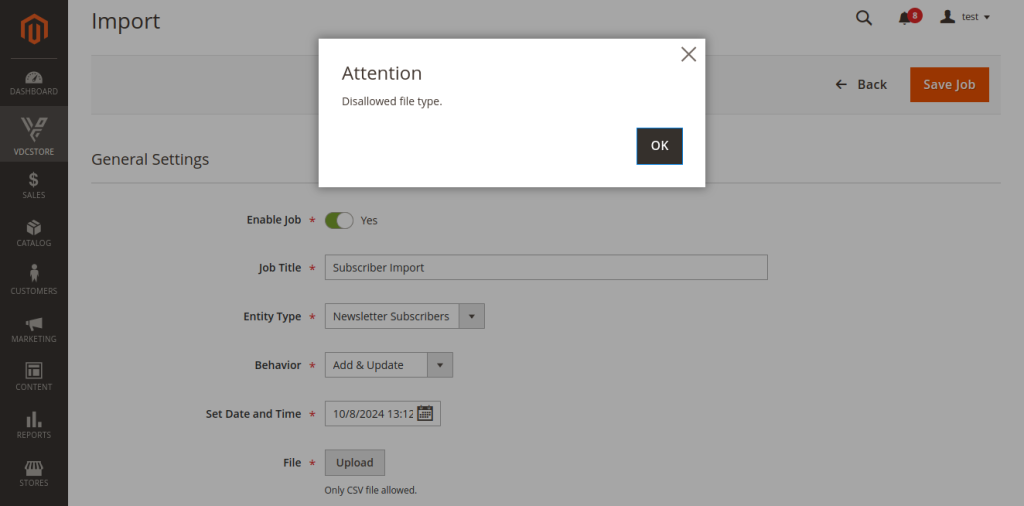
Only CSV files are allowed for import; any other file type will be rejected, and a warning message will be displayed.
STEP 13
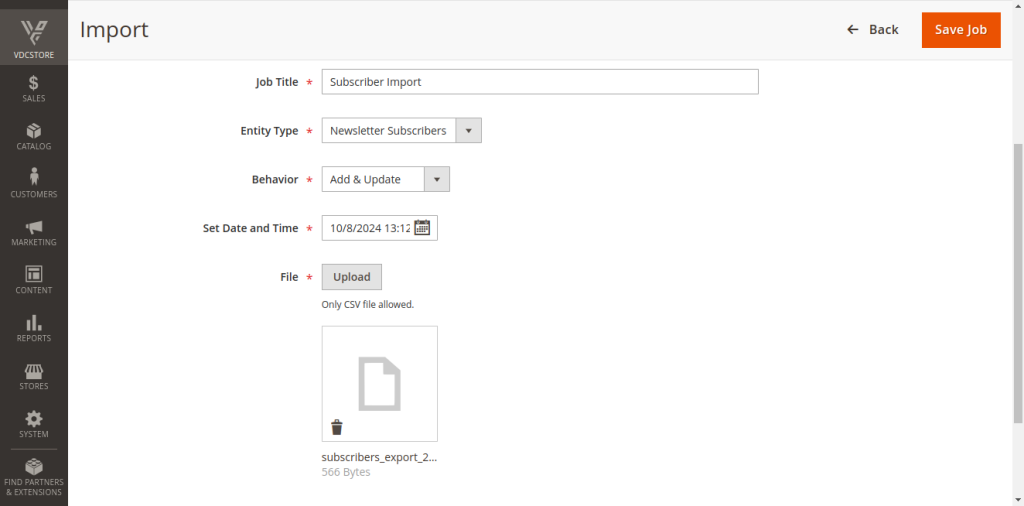
When the correct file is selected, a file icon will appear along with the file name displayed below it.
After filling in all required fields, click the ‘Save button’ on the top of the right side to save the import job.
Once saved, the job will run at the scheduled date and time.
If any errors occur during the import, they will be logged in the following file:
`magento root directory/var/log/Vdc_ImportExport.log`.
STEP 14
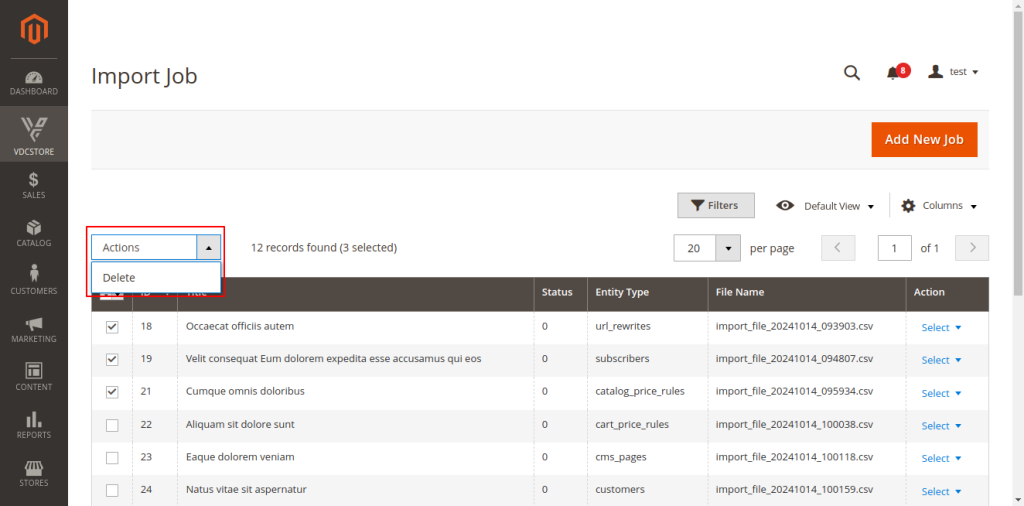
Mass Delete Job- You can delete multiple jobs in a single click.
Select the jobs you want to delete, then click Action => Delete to remove them.
STEP 15
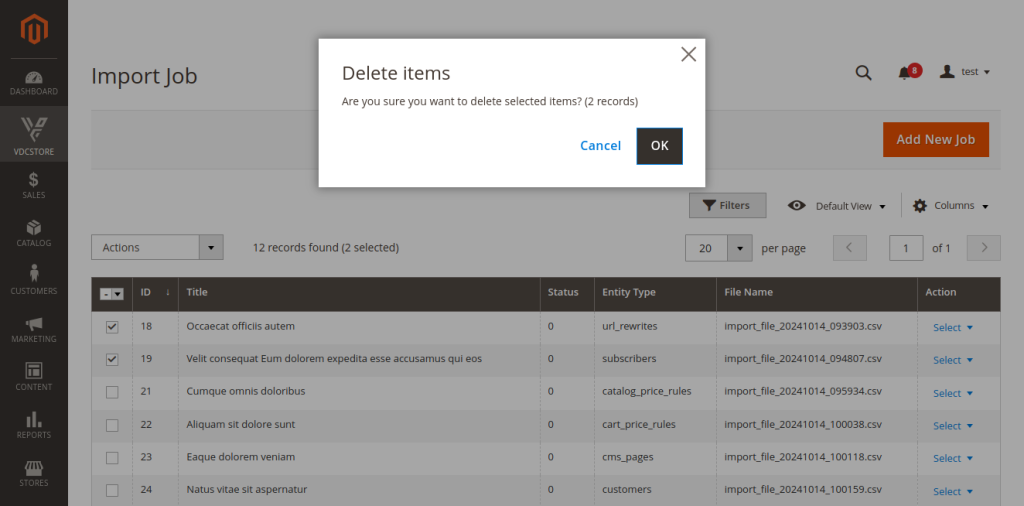
Delete Job Warning – When processing a mass delete, a warning pop-up will appear, asking for confirmation. Click ‘OK’ to proceed with deleting the selected jobs.
Required Field for Import CSV file
Before importing categories using a CSV file, it’s important to prepare the file with all the required information. You can Export a CSV file and use it to Import.”
Import Subscribers
‘subscriber_email’: ‘Email address of the person subscribed to the newsletter list’,
‘store_id’: ‘The unique identifier of the store that the subscription belongs to’
Import Customers
’email’: ‘Email address of the customer’,
‘firstname’: ‘First name of the customer’,
‘lastname’: ‘Last name of the customer’,
‘store_id’: ‘The unique identifier of the store (or store view) the customer is associated with’
Import Reviews
‘entity_pk_value’: ‘The unique identifier of the product being reviewed (Product ID)’,
‘title’: ‘The title of the customer review’
Import URL Rewrites
‘request_path’: ‘The URL customers enter in their browser (old or user-friendly URL)’,
‘target_path’: ‘The actual URL where the page or product exists (internal system URL)’,
‘store_id’: ‘The unique identifier of the store for which the URL rewrite is configured’
Import CMS Blocks
‘identifier’: ‘A unique identifier for the CMS block (used for referencing in code)’,
‘title’: ‘The title of the CMS block (for display purposes in admin)’,
‘content’: ‘The HTML content of the CMS block (what is shown on the frontend)’,
‘store_id’: ‘The unique identifier of the store (or store view) where the block is used’
Import CMS Pages
‘identifier’: ‘A unique identifier for the CMS page (used for referencing in code)’,
‘title’: ‘The title of the CMS page (for display purposes in admin)’,
‘content’: ‘The HTML content of the page (what is shown on the frontend)’,
‘content_heading’: ‘Heading shown at the top of the page’,
‘meta_title’: ‘Title used in the page’s meta tags for SEO purposes’,
‘meta_keywords’: ‘Keywords used in the page’s meta tags for SEO purposes’,
‘meta_description’: ‘Description used in the page’s meta tags for SEO purposes’,
‘page_layout’: ‘The layout used for the page (e.g., 1-column, 2-column)’,
‘store_id’: ‘The unique identifier of the store (or store view) where the page is displayed’)
Import Catalog Rules
‘name’: ‘The name of the catalog rule (discount or promotion)’,
‘customer_group_id’: ‘The ID of the customer group that the rule applies to’,
‘discount_amount’: ‘The amount or percentage of discount applied by the rule’,
‘website_id’: ‘The ID of the website the rule is applied to (if multi-website setup)’
Import Cart Rules
‘name’: ‘The name of the shopping cart rule (coupon or discount)’,
‘customer_group_id’: ‘The ID of the customer group that the rule applies to’,
‘discount_amount’: ‘The amount or percentage of discount applied by the rule’,
‘coupon_type’: ‘The type of coupon (specific coupon, no coupon, or auto-applied)’,
‘website_id’: ‘The ID of the website the rule is applied to (if multi-website setup)’
Import Categories
‘name’: ‘The name of the category (used to group products)’,
‘path’: ‘The hierarchical path of the category (e.g., root/category/subcategory)’,
‘url_path’: ‘The URL slug for the category’,
‘parent_id’: ‘The ID of the parent category (if it is a subcategory)’
Import Products
‘sku’: ‘The Stock Keeping Unit, a unique identifier for the product’,
‘name’: ‘The name of the product’,
‘price’: ‘The price of the product’,
‘url_key’: ‘The URL-friendly version of the product name (used in the product URL)’
Import Orders
‘entity_id’: ‘The unique identifier of the order’,
‘customer_id’: ‘The unique identifier of the customer who placed the order’,
‘shipping_method’: ‘The method of shipping chosen for the order (e.g., Standard, Express)’,
‘shipping_amount’: ‘The cost of shipping for the order’,
‘customer_firstname’: ‘The first name of the customer who placed the order’,
‘customer_lastname‘: ‘The last name of the customer who placed the order’,
‘customer_email’: ‘The email address of the customer who placed the order’,
‘shipping_address’: ‘The address where the order is to be shipped’,
‘billing_address’: ‘The billing address associated with the order’,
‘items’: ‘The list of items purchased in the order (product details)’,
‘payment’: ‘The payment method used for the order (e.g., Credit Card, PayPal)’
